Tuesday, September 23, 2008

Secure Login

Secure Login

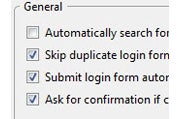
Little surprise that Secure Login provides a way to log you in to Web sites securely. It integrates with Firefox's password list--so when you visit a site, you can log in by clicking a button instead of having to type in your user name and password. Beyond that, Secure Login keeps your passwords safe in various ways. It stops any malicious JavaScript code from stealing your password, and it can block other password-stealing attacks, such as cross-site scripting (XSS) attacks.

Download Secure Login | Price: Free

wot

WOT

This Firefox add-in works in much the same way as the McAfee Site Advisor. WOT rates sites according to their privacy, security, and trustworthiness, from Excellent reputation to Very Poor reputation, and it displays an icon next to the Address Bar indicating how it rates a particular site. As you search, you'll be able to see the icon as well, so that you can decide before visiting a site whether you want to go there.

Download WOT | Price: Free

NoScript

Firefox Add-Ons

One great thing about Firefox is the large number of add-ons available to improve your browsing experience. The options include plenty of privacy-related add-ons. These three are among the best.

NoScript

The Web is built on interactivity, but those wonderful interactive features can be used to attack and damage your PC. JavaScript, plug-ins, Java, and other kinds of scripts and code on Web sites are hazardous. But here's the problem: If you turn them off completely, you lose some of the nicest things on the Web; and if you keep them, you expose yourself to danger.


For Firefox users there's a simple answer: a free extension called NoScript. NoScript lets you turn scripts, plug-ins, and other interactive elements on or off at will, leaving them turned on at some Web sites and turned off at others. It protects against dangerous cross-site scripting attacks, too.

The extension offers a remarkable amount of control, permitting you to customize which scripts and extensions to allow on a per-site basis. You can also block sites temporarily or permanently on each site.

Download NoScript | Price: Free

Hotspot Shield

Browsing Privacy and Security

Looking for multipurpose tools for protecting your privacy and security? The following three can help you surf anonymously, avoid trouble at wireless hot spots, and receive alerts about certain sites that may host malware designed to invade your privacy.

Hotspot Shield

Some of the most nefarious online dangers arise when you're away from your home or office: Wi-Fi hacking and snooping. In a hotspot at a public location, a bad guy can set up a sniffer to snoop on all the data sent by everyone nearby. The snoop can see all of the information you send and receive over the Internet, including your user names and passwords.

Hotspot Shield sets up a virtual private network (VPN) for you and encrypts all of your data so that it can't be read. It works in much the same way as the VPNs that companies use for their remote employees.

Hotspot Shield is quite simple to install, set up, and use, with one caveat: During the installation process, you must make sure not to let the Dealio toolbar be installed. It's adware that has nothing to do with how the program works, so choosing not to install it won't have any adverse effects. When you first launch the program, your default browser will launch and display an ad. But you can close that window and continue to surf safely.

Download Hotspot Shield | Price: Free

McAfee Site Advisor for Firefox

Browsing Privacy and Security

Looking for multipurpose tools for protecting your privacy and security? The following three can help you surf anonymously, avoid trouble at wireless hot spots, and receive alerts about certain sites that may host malware designed to invade your privacy.

McAfee Site Advisor for Firefox

One of the best ways to protect your privacy is to avoid getting infected by malware. These days, most people get infected by downloading infected software or by visiting a Web site that installs malware without their knowledge. So you'd like to know whether a site you visit is likely to infect you directly or to harbor malware.

With so many thousands of Web sites, though, how can you know which ones are safe and which ones aren't? MacAfee SiteAdvisor does a great job of letting you know. Perform a search in Google or Yahoo, and in each of the search results you'll see an icon that rates the safety of the site. A red X warns you that it's a dangerous sites; a green check means that it's safe; and a yellow exclamation mark means that it's questionable.

Hover your mouse directly over the icon, and a pop-up will appear, informing you of what might be dangerous about the site. It details whether the site has dangerous downloads, whether the site sends spam to you if you register on it, and whether the site includes links to other sites that are known to be dangerous. To get even more information, click More Info on the pop-up, and you'll receive a detailed list of the dangerous downloads, as well as what malware or adware infects the site.

Best of all, Site Advisor works when you browse sites, too. The software displays a small icon at the bottom of the screen as you surf. The icon warns you when you hit a dangerous site.

Download McAfee Site Advisor for Firefox | Price: Free

Browsing Privacy and Security Tor

Browsing Privacy and Security

Looking for multipurpose tools for protecting your privacy and security? The following three can help you surf anonymously, avoid trouble at wireless hot spots, and receive alerts about certain sites that may host malware designed to invade your privacy.

Tor

A surprising amount of information about you can be gathered as you surf the Web--including the operating system you use, the sites you've visited recently, your geographic location, and possibly your company (based on your IP address).

To keep these pieces of information private, try Tor, a free program that protects your anonymity as you surf. Tor takes all of your Internet communications, including instant messaging and other Internet applications, and sends them around a large network of "onion" routers that are Tor servers, making it impossible for sites or people to invade your privacy.

The Tor download includes other software that you need for maintaining your privacy--notably Privoxy, a proxy program. The programs work well together; and because the software self-configures, they are simple to use. Tor runs in your system tray. To become anonymous, right-click the icon and choose Start. From that point on, you'll be anonymous. To stop surfing anonymously, right-click again and choose Stop. You can even change your Tor identity for maximum cloaking.

Download Tor | Price: Free

HijackThis

HijackThis

If spyware or a Trojan horse slips past your defenses despite your best efforts, your best bet is to download HijackThis. It can help detect problems that other malware detectors can't find, and then will advise you about what to do.

Unlike most other antimalware software, HijackThis doesn't automatically detect dangerous software. Instead, it looks deeply into your system's Registry and into other nooks and crannies that are likely to be infected, and then saves its results to a log file. You then post the log file to the HijackThis Web site for experts to examine; they take a look, let you know if your system is infected, and then tell you how to fix the problem. There are plenty of similar discussion areas where experts congregate on the Internet; to find them, run a Google search.

Download HijackThis | Price: Free

Rootkit and Malware Killers F-Secure Blacklight Rootkit Eliminator

Rootkit and Malware Killers

Even the best antivirus and antispyware tools can't keep you completely safe. Rootkits often escape detection, and once they lodge on your PC, they give an outsider the power to take control of your system and help themselves to whatever private information they want. These two rootkit and malware killers, though, tip the odds in your favor.

F-Secure Blacklight Rootkit Eliminator

One dangerous type of malware that might infect your system is a rootkit. It hides deep in your system, using tricky techniques to shield itself from many antispyware, antimalware, and antivirus programs. With a rootkit in place, a malicious person can take complete control of your PC without your knowledge. Rootkits spread online in various ways, such as by riding along on another download.

Some antivirus tools, such as Avast, claim to detect and kill rootkits. Many do not. But even if you use an antivirus tool that claims to detect them, you'd do well to download, install, and use F-Secure's Blacklight Rootkit Eliminator, too. This freebie is designed exclusively to detect and kill rootkits.

The program inspects your PC's folders, files, and hidden processes for signs that you've been infected with a rootkit. It then tells you whether your system is rootkit-free or may be infected, listing every sign of infection that it found. Double-click on each listed entry, and you'll see more information, such as a description of the item, the company that made it, and its file location. You can then use Blacklight Rootkit Eliminator to quash the threat, which the program accomplishes by renaming the file and giving it a .ren extension so that it can't do any further damage. Before taking that step, though, it's a good idea to search for the file name on Google and make sure that the file is a rootkit and not some legitimate file. If your PC continues to function well after you've renamed the file, you can eventually delete the renamed files.

If you aren't an experienced PC user, you might want to stay away from this program. Renaming and deleting files can wreak havoc on a PC; so if you don't feel comfortable renaming, restoring, and deleting files--and troubleshooting PCs--you may be courting danger with this utility.

Download F-Secure Blacklight Rootkit Eliminator | Price: Free

SendShield

SendShield

A lesser-known privacy problem may be among the most dangerous: hidden information in Microsoft Office documents that becomes exposed after the documents are made public.

This problem has struck some of the best-know enterprises in the world. In 2006, for example, Google publicly posted a PowerPoint presentation that contained notes disclosing highly sensitive financial projections to the world. Even worse, in 2003, Alistair Campbell, top communications aide to then-Prime Minister Tony Blair of the UK, released a Word document whose hidden information revealed that the British government had used plagiarized documents to justify its involvement in the Iraq war.

Google and Blair found out the hard way that Office documents contain lots of private information that the sender might prefer that the world not see, such as hidden text, names of author documents, revision history, markup, hidden cells, and hidden spreadsheets. When such information hitchhikes along with the visible text of a document, people can find it without much effort.

What to do? Get SendShield, an excellent, well-designed freebie. Whenever you send a Microsoft Office document via Outlook, SendShield looks inside the document for private information--and shows you what it finds. You can then delete all of the information if you wish. The deletion affects only the copy of the document you send; the original file remains intact on your PC.

Download SendShied | Price: Free

Cleaning Your Traces

Cleaning Your Traces

Here's another great tool--and a longtime favorite of ours--for cleaning up all traces of your Internet activities. CCleaner cleans Internet Explorer and Firefox, of course, but also Adobe Acrobat, Adobe Flash Player, Google Toolbar, and Windows Media Player. It even picks up after major applications such as Microsoft Office, and it includes a Registry cleaner and an uninstaller.

Download CCleaner | Price: Free

Free Internet Window Washer

Cleaning Your Traces

As you surf, your web browser leaves traces of your travels on your PC. Web sites can look into some of those traces. And if other people use your PC, they can easily look at those traces as well. Luckily, there are tools that can get rid of the tracks you leave behind.

Another privacy problem relates to Microsoft Office documents containing private information (unbeknownst to the sender) that get sent out via e-mail. A download helps here, too, removing information that you don't want made public from the Office documents where it appears.

Free Internet Window Washer

Worried that Web sites may snoop on your Internet activities, or that someone else who uses your PC can see where you've been and what you've done? If so, you need an Internet washer--a tool that will delete your Internet Explorer browsing history, recently typed URLs, browsing history, and so on.

That's what Free Internet Window Washer does--for free. Click Wash Settings, then click Browsers, and then select what you want the program to clean. Back on the main screen, click Wash Now and the program will remove everything you've asked it to. If you prefer, click Test Now to see a preview of what the program will do.

Besides cleaning Internet Explorer, Free Internet Window Washer also cleans traces from instant messengers, including AIM, ICQ, MSN Messenger, Skype, and Yahoo Messenger. It also cleans traces from a wide array of other programs, including Microsoft Office and Adobe Acrobat.

Free Internet Window Washer | Price: Free

KeyScrambler Personal

KeyScrambler Personal

One of the biggest dangers you face online is theft of your user name and passwords for logging into commercial Web sites (such as banking and financial sites) and Web-based e-mail accounts. A criminal who steals that information could empty your bank account and use your e-mail address to pose as you.

This add-in to Internet Explorer and Firefox promises a simple way to keep you safe. As you type your password, KeyScrambler Personal scrambles it so that the information sent out over the Internet doesn't match what you type. That way, a lurking crook won't be able to steal your private information.

A small icon sits at the bottom of your screen, telling you that KeyScramber Personal is going about its work. As you type, you'll also see the scrambled text that the program is sending.

Download KeyScrambler Personal | Price: Free

Password Protection

password Protection

Password theft is one of the greatest privacy dangers that an Internet user faces online. With the following downloads, you'll be able to keep your passwords private and yet still keep track of them.

KeePass Password Safe

Most people have dozens of passwords that they use for Web sites, Web-based mail, ATMs, and more. They have become a fact of automated life. But it doesn't matter how much antivirus software and antimalware you use; if your password is stolen, you're in trouble.

KeePass Password Safe offers a simple way to keep track of all your passwords while keeping them safe. It lets you store all of your passwords in a lightweight, simple-to-use database, and it encrypts the database so that only you have access to it. You can lock it with a master password or with a file key.

The program stores all of your passwords in groups, so you can quickly find the one you want. And the program lets you easily drag and drop your passwords, copy them to the clipboard, and paste them into a Web page or an application using a hot-key. You can also search for passwords, and print and export them in various formats, including CSV, HTML, TXT, and XML files. You can import them, too.

The application can generate hard-to-crack passwords for you, as well--a nice extra for people who want to make their passwords extra secure.

Download KeePass Password Safe | Price: Free

Vista Firewall Control

Vista Firewall Control

Windows Vista's firewall is better than the one built into Windows XP because it includes outbound protection as well as inbound protection. Outbound protection is vital, because Trojan horses and spyware often use silent outbound connections to do their damage. In addition, some surreptitious software uses invisible outbound connection from your PC to send out spam or malware without your knowling it.

The Windows Vista firewall has one big problem, though: The outbound firewall is almost impossible to configure. The free Vista Firewall Control utility gives you the control that Vista should have. With it, whenever a program attempts to make an outbound connection, an alert appears, identifying the application's path and file name, the publisher's name, and the application's name. Based on what you see, you can then choose to enable or disable the connection permanently or one time only.

Download Vista Firewall Control | Price: Free

Comodo Firewall Pro

Comodo Firewall Pro

If you have Windows XP or Windows Vista, you have a firewall on your PC courtesy of Microsoft, so you may figure that you're perfectly safe. Wrong--the firewalls built into both of those operating systems have problems. The Windows XP firewall, for example, lacks outbound protection. And the Windows Vista firewall is exceedingly difficult to customize.

A great bet for a truly flameproof firewall is the free Comodo Firewall. It offers great protection against both inbound and outbound threats, along with some very nice extras. Its Defense+ feature, for example, locks down particularly vulnerable files and folders so that nothing can alter them.

If you use this firewall, you will have to spend a bit of time training it. Whenever an application tries to access the Internet from your PC, you'll get a pop-up that asks you whether you want to allow the application to proceed. If you'd like to cut down on the training time and the number of interruptions, use the program's Clean PC mode. In this mode, Comodo scans your PC for applications and registers them as safe. Afterward, you won't see as many alerts.

Among Comodo's other nice extras is an install mode that shuts off the firewall for 15 minutes, so you can install a new application without getting inundated with alerts.

Download Comodo Firewall Pro | Price: Free

Wednesday, September 3, 2008

Windows XP Performance Tips - How to Remove Programs From the System Tray

Windows XP Performance Tips - How to Remove Programs From the System Tray

The System Tray also known as the Notification Area is the area at the right side of your taskbar, or bottom right of you computer screen, which by default holds the clock and the speaker icon. With the exception of the clock, the purpose of the tray is to hold status icons placed there by Windows and other running programs.

You may see icons for a number of programs in the System Tray such examples include Microsoft Messenger, anti virus programs, third party firewall or media player programs or photo editing programs. Each icon represents a utility program that is currently running in your system or has automatically started when Windows first loaded. Some of these programs are useful, some are not, but what connects them all is that together they can increase the amount of time that it takes for your PC to start and load Windows.

If you have a number of icons in your system tray, your system could be suffering from longer startup times and an overall slow performance. Get rid of a few of these programs from the system tray and you may find your system running leaner and faster than before.

Follow the step by step instructions to begin removing programs for your system tray and increase the performance of your computer. We will remove MSN Messenger here as an example.

Step 1

To remove an unnecessary program from the system tray, right click on its icon and select either the option that takes you to the program's setting otherwise into the program itself.

Step 2

If you have to go into the program itself, you can usually access the settings by clicking on Tools in the menu bar and selecting Options (or setting preferences depending on the program).

Step 3

From within the settings menu, there is always an option to disable the program from automatically loading when Windows Starts.

Step 4

Inside Options of Microsoft Messenger, you can prevent it from loading when you log on.

For more Windows Tips, including security, performance, customization, maintenance, recovery, efficiency, networking and registry tips, all with step by step instructions, be sure to be visit our website and begin to unleash your computers potential.


Windows XP Customization Tips - How to Assign a Picture to Your Account

Assigning a picture to a user account is likely to be one of the most popular account changes made in Windows XP. When you first set up your user account, Windows automatically assigns a picture to your account. However, you can select a different picture for your user account that better suits your personality and interests.

Windows provides pictures that you can choose from for your user account, or you can select a picture you have stored on your computer to place beside your user name at the top of the Start menu. The picture for a user's account can be of the BMP, GIF, JPG, PNG, or TIF file type.

When you select a new picture for your user account, the new picture will appear on the Welcome screen each time you log on to your computer. The Welcome screen displays all the user accounts that are set up on your computer and allows you to select the account you want to use.

To make changes to other accounts you must be logged on as an administrator. If you have a limited account, you can change the picture for only your own account.

Follow the step by step instructions to change the picture displayed on your account and make your windows more personalized.

Step 1

Click on Start menu and select Control Panel. In Control Panel Window click on User Accounts.

Step 2

The new window will ask you to Pick a Task. Click on Change an Account.

Step 3

In the User Accounts window select the account you want to change.

Step 4

A list of tasks that you can perform appears here for the account you selected. Click on Change my Picture.

Step 5

The new area displays the pictures you can use for the account. Browse through the pictures and select the picture you want.

Step 6

Click on Change Picture button to change the picture of the user account.

For more Windows Tips, including security, performance, customization, maintenance, recovery, efficiency, networking and registry tips, all with step by step instructions, be sure to be visit our website and begin to unleash your computers potential.


Windows XP Perfomance Tips - How to Stop Programs Running at Startup

Do you find that Windows is becoming slower during start up? If you have had you computer for quite a while, you will have probably noticed that it's not as speedy at loading as it used to be. Fortunately, there are a range of alterations you can do to reduce the time it takes for your computer to start up.

Windows XP comes with its own System Configuration Utility, more commonly know as MSCONFIG. It's available only to Windows XP user accounts that have administrator privileges. It is a very powerful tool, mainly used by IT professional and technical support operators, so if you are in doubt then we recommend you learn more about it before using this utility.

MSCONFIG offers an ability to determine what programs run at startup. This provides a more powerful tool to disable programs than clicking the icons in the System Tray or removing programs from the Startup folder. Of course, alongside that is a greater chance to make your system unstable by digging too deeply into the tools on offer without a guide, but for the purpose of speeding up the loading time for Windows XP, its ideal.

Follow the step by step instructions to stop programs running at startup and improve the performance of your computer.

Step 1

To access MSCONFIG, click on RUN command from the Start Menu and type 'msconfig' (without quotes) and then click on OK.

Step 2

In the System Configuration Utility click on the Start Up tab to view all of the startup items.

Step 3

To prevent an item from starting up when Windows does, deselect it by clicking on the checkmark next to its entry in the list. Although you can deselect as many as you like, it is best to try just one at a time.

Step 4

Click on the Apply button to confirm the changes, before clicking on close and exiting MSCONFIG.You will need to restart your computer before any of the changes come into affect.

Step 5

After Windows restarts and you log back in again, System Configuration Utility dialog box appears.

Step 6

Tick the box 'Don't show this message or launch the System Configuration Utility when Windows starts. Click OK.

For more Windows Tips, including performance, customization, maintenance, recovery, efficiency, networking and registry tips, all with step by step instructions, be sure to be visit our website and begin to unleash your computers potential.


Windows XP Security Tips - Step by Step Guide on How to Add Or Change Your Windows Password

After working with Windows XP for a while, you will find that you have built up information, photos and documents. Microsoft provides security features in Windows XP that help you to keep your information private, whether at work or home.

Use password protection to keep people from accessing your computer when you are not around.
A Windows password stops people from logging on to your account at all, and a screen saver password ensures that nobody can stop the screen saver from running without entering a password.

Follow the step by step instructions to change your account password and begin to keep your files and documents private. To view these instructions with guided screenshots visit our website and click on PC Tips, and then select Security Tips.

Step 1
Click on Start menu found on the bottom left of your screen and select Control Panel.

Step 2
A new window will pop up called Control Panel. In the Control Panel window click on the User Accounts icon.

Step 3
In the User Account window, select Change an Account to begin changing the account details.

Step 4
A new window will open asking to pick an account to change. Select the account you wish to add a password to.

Step 5
Select Create a Password to create a new password for your account.

Step 6
Type in the new password and confirm the password in the next field. Once you have finished Click Create Password to complete.

For more Windows Tips, including performance, customization, maintenance, recovery, efficiency, networking and registry tips, all with step by step instructions and guided screenshots, be sure to be visit our website pconline, and begin to unleash your computers potential.


Windows XP Security Tips - How to Keep Your Computer Secure With Windows Update

Windows XP, other software, device drivers, and even your computer's BIOS all require periodic updates. These updates typically include security patches, new features, repair recently discovered problems and help protect your system from viruses and other security threats.

Installing software updates should be part of your regular computer maintenance routine to help ensure a smooth interaction between your hardware and software components.

Over time, Microsoft publishes changes to Windows. Some changes are minor additions to Windows features while other changes are designated as critical updates developed to repair bugs that can hamper your system's performance, compromise its security or cause system crashes.

Windows XP Update feature helps you keep windows up-to-date by automatically checking for Windows updates, service packs, and fixes for security holes, and notifying you that they're available for installation. It's best to leave this setting on Automatic for convenience and security.

Follow the step by step instructions provided to enable your Windows update and keep your system secure. To see screen shots of these steps you can visit our website and click on PC Tips, and select Security Tips.

Step 1

Click on Start menu found on the bottom left of your screen and select Control Panel.

Step 2

A new window will pop up called Control Panel. In the Control Panel window click on the Security Center icon to view and manage your security settings.

Step 3

The Windows Security Center appears and displays the status of Automatic Updates.

Step 4

You can turn Automatic Updates On/Off by clicking Automatic Updates at the bottom of the Windows Security Center window. Once the the Automatic Updates dialog box appears select your choice On/Off and click on Apply.

Step 5

To install Windows update to your computer click on the Windows Update Web site link from this dialog box.

Step 6

Follow the instructions from the Microsoft website to download the latest updates.

For more Windows Tips, including performance, customization, maintenance, recovery, efficiency, networking and registry tips, all with step by step instructions and guided screen shots, be sure to be visit our website and begin to unleash your computers potential.


Windows XP Pro Tweaks and Tips

Before Windows Vista came along, most individuals - home users and professionals alike - used

Windows operating systems have registries which logs and saves data on all of your PC and Internet activities. If you are very competent, you can directly edit the registry. To do this, Click on the Start menu, choose Run and then type regedit.exe. This command will bring you to the Registry Editor. But before you do anything to your registry, you should back it up first. You can cause serious damage by simply deleting or altering one file. So make sure you can also go back to the unedited registry.

If emptying the Recycle Bin every so often is much of a hassle for you, you can permanently delete a file without making it pass through the Recycle Bin. Simply press and hold down the Shift key when you delete a file. A confirmation will be prompted, choose yes to permanently delete your chosen file.

To increase PC performance, you can also set some programs as a priority when you are multitasking and using multiple programs simultaneously. To do this, press and hold down control alt delete to go to the task manager. Go to the Processes tab and choose a program you want to prioritize, right-click the highlighted program and choose the "set priority" option. Setting a priority higher than usual will make the particular program steal CPU time from other running programs.

These Windows XP Pro tweaks should be used with caution as to avoid causing unnecessary damage to your computer.

Kris Mainieri is an accomplished Computer Tech focusing on innovative and unique ways to help people take their computing performance to a whole new level free.

For a limited time, you can claim the "Secrets That Most People Will Never Know About Computers" e-book absolutely free Windows XP Tweaks CLICK HERE!

Tips to Help When Buying Replacement Windows

When is the Best Time of Year to Consider Buying Replacement Windows?

Buying replacement windows can be a big project. Here are some tips to get you started on the right track to a successful window replacement.

The best time of year to consider buying replacement windows is around spring or fall. Buying replacement windows and having them installed will leave your home open to the elements for a day or so. You want to avoid hot, cold and rainy times of the year if possible.

The first thing anyone should do is budget for the windows. This can become a big factor in your choice. Prices of windows vary greatly. Your budget may or may not allow you to get into higher design options. This is one of the most important tips.

You need to know which windows, if not all, have to be replaced. Look at the type of window and decide on whether you want to replace it with a new style or use a style just like your old ones. You'll need to evaluate how your original windows were installed as well as note any potential problems with tear-out and preparation for the new windows.

Buying Replacement Windows

Once you have a good understanding on what you need, call around and get estimates on the installation. If you are able to, it is possible to install the windows yourself and save money. But make sure you have enough and experience and expertise to be able to perform this project. An improper window installation can cause many problems.

If you need an installer after buying replacement windows, make sure to go over your different options with them. Make sure they understand what results you want from your new windows. Before choosing a contractor you should get several bids and compare them. Getting a guarantee and signing a contract is important when buying replacement windows and hiring an installer.

Another important aspect of hiring someone to do a remodeling job is the need to feel comfortable around him or her. Whoever you choose will be working on your home, and you'll want to feel at ease about letting them work. If you are not sure about any given contractor's credibility, ask them for references and have them checked out.

For further satisfaction do not pay for the job until the job is done right. A deposit may be necessary but try to keep it as low as possible.

This article was written by Gregg Hicks of http://www.reliableremodeler.com which provides Internet-based home improvement information and services. Offering homeowners a simple, quick, and free way to access, qualified home improvement remodeling contractors.

Top Tips On How To Dress Your Windows Beautifully

Let your windows steal the show with fabulous new curtains and blinds. Whether you have a bay or straight window, discover the best way to dress it up?

Use a wave heading

Soft waves of fabric create a smart but simple finish that's easy on the eye. A wide Tempo heading pleat makes curtains fall in soft, regular waves, so they will always look just right. Team it with a sleek, modern suspension rail that the curtains glide below and let the curtains sit flush with the floor so they'll look neat open or closed.

Stylist's tips

A cut-velvet pattern adds a luxurious edge to this otherwise pared-down window treatment.

Where to buy

Curtains made in Bolivia 230 0321, £37 per metre, Camengo.

Use a double pole

Need to dress your window for privacy and prettiness? A double pole lets you do both

A clever double pole design means you can hang both a sheer and a curtain around the bay window, but draw them independently. Brackets normally get in the way of curtain rings being pulled around a bay, but this design uses passing rings that allow the curtains to be drawn all the way round. A standard heading tape left ungathered on both curtains creates a soft, informal effect. Keep the sheers sill-length for a neat finish and go for floor-length curtains to create real impact in a bay.

Stylist's tips

Team a bold, modern, floral curtain fabric with a floral patterned voile for a modern take on a curtain and sheer.

Where to buy

Curtains made in Samara J515F-01, £37 per metre, Jane Churchill. Voile curtains made in Sophia 074, £48 per metre, Harlequin. Fusion double curtain rail, custom-made by the Bradley Collection.

Use a pelmet

A neat, modern pelmet creates a smart, fuss-free finish in a large bay window

For a contemporary take on a traditional curtain finish, use a small pelmet that picks up one of the colours in the curtains. It gives a sophisticated finish to a bay window and means you can use a plain curtain track around the bay as it will be concealed by the pelmet. Team it with a curtain in a pinch pleat heading that creates regular gathers for an equally understated effect. A pair of holdbacks that match the pelmet is all that's needed when you want to draw the curtains back and let in maximum light.

Stylist's tips

For a hotel-chic window treatment like this, choose striped satin for a tailored look and give the pelmet a touch of decorative detail with a fringe trim.

Where to buy

Curtains made in Sapphira 8515, £48 per metre, Harlequin. Pelmet and holdbacks made in Jem silk in Maroon 33, £19.90 per metre, Linwood. Ruche trim JM38E-02, £27 per metre, Jane Churchill.

Use Four Single Curtains

Dress up your bay window with four sweeping curtains for an elegant finish

A pair of curtains hung centrally, plus a curtain to each side of the bay, makes an opulent alternative to a single pair of curtains. A flat-faced pole in a wood-effect and metal finish is a feature in itself - use a suspension-rail system so that the fabric gathers neatly below the pole and doesn't hide it. Position a holdback for each curtain two-thirds of the way up the window, so the curtains can be draped across the top part of the window when drawn open. Allow plenty of length on the curtains so they pool on the floor to complete the lavish look.

Stylist's tips

Repeating the colour of the curtain pole in the fabric's trim pulls the whole look together.

Where to buy

Curtains made in Sapphira 8515, £48 per metre, Harlequin. Pelmet and holdbacks made in Jem silk in Maroon 33, £19.90 per metre, Linwood. Ruche trim JM38E-02, £27 per metre, Jane Churchill.

Use Blinds and Curtains

Team blinds for controlling the light with dress curtains that frame the bay

Roll-up blinds are a fuss-free way to dress a bay. Go for a bold pattern that can be seen in all its detail and choose a complementary plain fabric for the back of the blinds so your window looks good from outside, too. Combine with an attractive pole around the bay and narrow dress curtains at either side. These provide a soft framing effect for the window, but can't be drawn closed. Snap-together rivets attach the curtain fabric to the pole for a neat, modern finish that doesn't require heading tape.
Stylist's tips Choose the same fabric for the dress curtains and the back of the blinds, as this will be on show when you roll them up during the day.

Where to buy

Curtains and blind backs made in Venice Grass, £27.75 per metre, Villa Nova. Blinds made in Osaka 658-26102, £14 per metre, John Lewis.

Use a Leading Edge

Create an eye-catching effect for a plain window with a vivid leading edge

A curtain with a leading edge is a real show stopper. A contrasting fabric from the back of the curtain is continued to the front, and simple holdbacks allow even more of it to be on show when the curtains are open. Use a simple pencil pleat and an unfussy pole to keep all the attention on the curtains themselves. You can enhance the effect of this stunning treatment by choosing a pole that's slightly wider than the window, which tricks the eye into thinking that the window is bigger than it really is and allows you to hold the curtains back without blocking light.

Stylist's tips

A satin-finish fabric for the leading edge gives it even more attention-grabbing shimmer.

Where to buy Curtains made in Stanza Onyx 1041/04, £20.50 per metre; Leading edge, backing and cushion made in Valetta Gerbera, £23.50 per metre; all Villa Nova.

Use Panels

Mix panels of plain and pictorial fabric for a window that's a real work of art

A fabric with a pretty illustration is a great way to dress up a window with an uninspiring view. Use plain fabric for two-thirds of the length, with the panelled pattern on the lower third. Create visual separation between the two with a ribbon braid, finishing off with a trim below. An eyelet heading on a pole means the fabric won't fold up, so the illustration can be seen clearly. Keep the curtains to sill height so they hang properly, draw easily and don't block heat from the radiator.

Stylist's tips

Choose a plain fabric in a paler contrasting colour and trim the join to make the print stand out.

Where to buy

Curtains made in Agean Blue, £8.99 per metre; Beaded trim, £5.99 per metre; both The Fabric Warehouse. Panels made in Petits Oiseaux in Framboise on White, £39.50 per metre, Brocante Fabrics.

You can find more information on interior design and interior design ideas at house to home, helping you create a look you'll love

Computer Repair Tips - How to Use Windows ScanDisk

I love ScanDisk. Honestly, I do. As a computer support specialist with over 18+ years of experience, I often had to use this great little utility. It's fairly powerful, works on all versions of Windows and best of all is free since it comes bundled inside Windows.

So what is it?

ScanDisk is disk-checking and diagnostic tool that you can use to test your hard drive. It can also be used repair problems on magnetic media; hard disk and floppy disks.

Why use ScanDisk?

It's a very easy to use program and even the most non-technical person can learn how to use it. It can quickly fix most common disk errors. And I did mention it's installed as a part of Windows so it is always available. If you can boot into Windows, then you can use the program.

How to use it in Windows 98/98SE/Me:

1)Close all programs.

2)Click on the "Start" button.

3)Go to "Programs"

4)Scroll to "Accessories"

5)Click on "System Tools"

6)Select "ScanDisk"

7)Now locate and select the drive you want to check (C:).

8)Check the "Standard" radio button.

9)Check the "Automatically Fix Errors"

10)Click "OK" to run.

How to use it in Windows 2000/XP/Vista

1)Close all programs before you begin.

2)Click on the "Start" button then "My Computer".

3)Right click on drive you wish to scan and then click on "Properties".

4)Now you click on the "Tools" tab at top of pop-up window.

5)Click on "Check Now" in the "Error Checking" section.

6)Check the "Automatically Fix Errors"

7)Click "OK" to run.

Testing Options in Windows 98/98SE/Me:

Standard: This option basically only checks files and folders for Windows system errors. This is good for routine maintenance checks.

Thorough: This option is not used often due to time constraints. Don't check "Thorough" unless you can let the machine run uninterrupted for several hours (2+ on larger drives) or overnight. I'm not kidding.

Thorough is used for when you are having severe hard drive issues only. When you have to check your drive for possible physical damage, check "Thorough" and then select, click "System and Data Areas"

Testing Options in Windows 2000/XP/Vista:

The "Standard" function in the older version is now the default. Just with click "Automatically Fix Errors"

To use a thorough scan to check for both system and physical errors, you should also check "Scan For and Attempt Recovery of Bad Sectors."

To run scandisk in Windows 2000/XP/Vista you have to have programs closed down, or you will keep getting a error message, "Disk check could not be performed because exclusive access to the drive..." If this keeps happening then if possible restart your computer and press "F8" after PC the logo but before Windows starts. This will let you into Windows "Safe Mode". You can run ScanDisk now but be warned it will take twice as long but will give you the same results.

ScanDisk Test Results:

After processing you should get a pop-up window with the results of your test. The important to look for is "Bytes in bad sectors". This shows the number of bytes that have been marked bad or basically unusable for storage. It's normal to have a small number of bytes in bad sectors (less than 100,000). But more than this or an increased number over time is sign for keeping your file backups up to date and saving for that bigger, better hard drive.

Sick of computer headaches? Tired of wasting money on that "computer repair guy"? To learn more fast and free fixes for your problem PC, visit http://www.fixcomputerproblemsguide.com

Hard Drive Crashed? - Repair or Rescue Any Hard Drive. From Chancer Reese, your Small Office Tech Diva.

10 Tips And Shortcuts To Make Using Windows Easier

here are a number of tricks and shortcuts that are fairly well known among people that have been using Windows a lot over the last 14 years of it's existence. However, we tend to take it for granted that everyone knows these things, when in fact they don't.

Some of these functions are documented in the Windows help files, but I've noticed (with our secretary and my colleagues, for example) that most people never read the help files. I suppose they are kinda boring...

So with out further ado, here are some turbo tips for Windows:

(If a key name is in bold, it means you HOLD IT DOWN while pressing the other keys)

1. Windows key (the one with the flying window on it) and E will open Windows explorer, instead of right clicking the My Computer Icon on the desktop and then clicking Explore. Very useful if your desktop is full of open windows and you wnat to get another explorer window open.

2. Ctrl B for making marked text bold

3. Ctrl C to copy marked text to the clipboard

4. Ctrl V to paste that text into a new document.

5. Ctrl A selects All; either all text in a document, or all files in Explorer.

6. Alt Prt Sc to copy the presently open window to the clipboard. You can then use Ctrl V to paste it, as a jpeg image, into a document, or a photo editing program.

7. Crtl Shift Esc will open Task manager, where you can see what processes are running, and stop them if they are misbehaving and won't close. Task manager also gives you a graph which shows how hard your CPU and memory are working.

8. In Windows Explorer and in Outlook Express (and other programs) if you click on the column headings, it will sort the whole thing according to the alphabetic/numeric order of that column. Clicking it again will reverse sort it.

9. Clicking a word of text twice will highlight (ie mark) that word. Clicking the word three times in quick succession will select the whole sentence, line or paragraph. (Depending on your text editor)

10. In Windows Explorer, if you hold your Ctrl key down, you can click on numerous, random files and select them, even if they are not contiguous (For foreign readers, this means: one after the other)

I hope this helps you. I will post another 10 tips in my next article.

Duncan Kelly

If you think this article is good, you should see the others! Visit the WrinklyO Web Node at http://wrinklyo.googlepages.com

A lot of other items are there that you may just be interested in. Check out the Promotions and Special Offers Page!

May you have a successful day!

Duncan Kelly